One of the techniques mixers use to create interest is to give a track (or set of tracks) a different treatment when a song changes to a new section. In “Tony Maserati Mixing Lifeboats Pt. 4,” Tony does just that, adding saturation to the lead vocal on the bridge. He even goes a step further by isolating one line of the bridge vocal and saturating it differently than the rest of that section.
Two is Better Than One
As the video excerpt starts, the bridge vocal has already been separated onto its own track in Pro Tools. Tony then duplicates it to allow him to treat the line, “Throw me to the ocean floor,” differently.
He next goes through the duplicated track and mutes everything except for “Throw me to the ocean floor.” On the original track, he mutes only that line. Now he’s ready to start experimenting with the processing.

After making a copy of the bridge vocal track (highlighted here), Tony mutes specific sections so that there’s no overlap.
He listens again to the bridge vocals and says that he’d like to change the saturation plug-in. Right now, he’s using Soundtoys Devil-Loc, which is a unique distortion plug-in based on an old Shure Level-Loc limiter. But cool as that plug-in sounds, he’s looking for something different for these tracks.
At this point, both the original bridge vocal and the duplicate have the following inserts: Fab Filter Pro-DS de-esser, UAD Fairchild 670 Compressor and Devil-Loc.
Fresh Choices
Next, Tony replaces the Devil Loc on the original track with a Waves Scheps 73. The latter is a Neve 1073 preamp-emulation plug-in that Waves developed with Andrew Scheps.
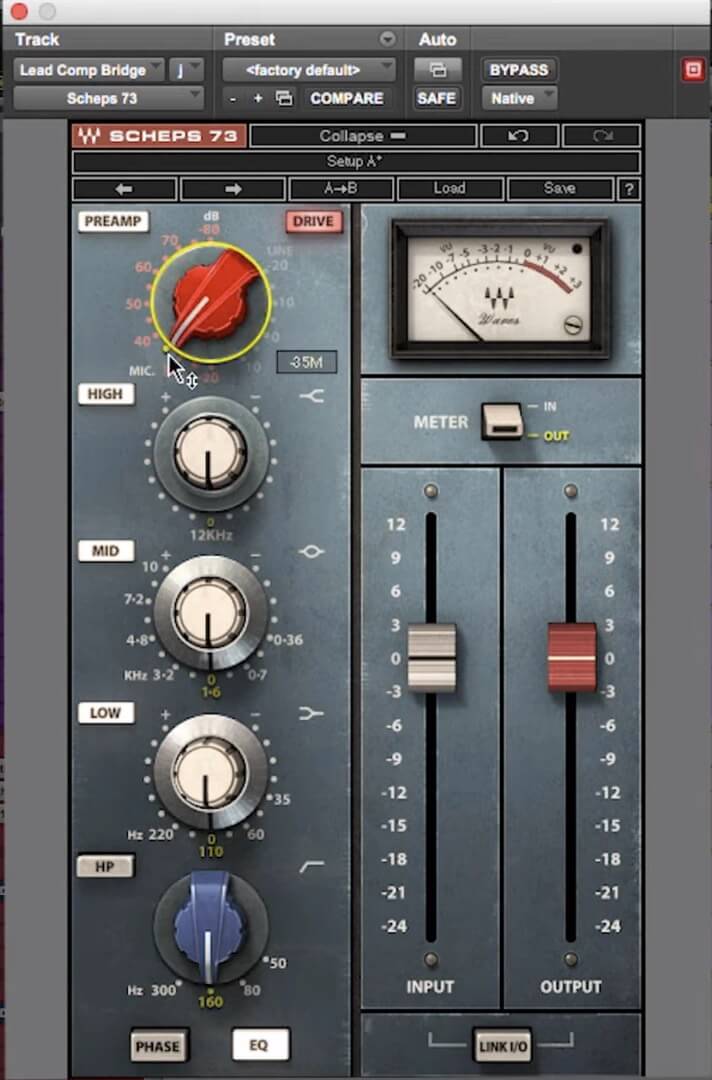
On Scheps 73 and a hardware 1073, the red section on the left of the preamp knob is the much hotter mic gain.
Like a Neve 1073, the Scheps 73 has two-level ranges for its preamp gain: Line and Mic, with the latter offering significantly higher levels. Tony finds a setting at the lower end of the Mic range, which provides a fair bit of saturation.
He then addresses the duplicated track for the “Throw me to the ocean floor” line and replaces Devil-Loc with Softube Saturation Knob, a simple, effective saturation plug-in. (Saturation Knob is freeware. All you have to do is create a free account at softube.com, and you’ll be able to download it.)

Softube’s Saturation Knob is simple but effective, and you can’t beat the price.
Tony sets the plug-in’s Saturation Type switch to Natural and pushes the knob up to about 11 o’clock, which is a little less than half. That creates a more saturated tone, setting it apart a little tone-wise from the rest of the bridge. Subtle differences like that can help make a mix come alive.
A Crush on a Vocal
You can use saturation in so many ways on vocals (and instruments)—everything from softening the transients to adding fatness to adding distortion.
In the following examples, on a rock vocal, we’ll use three different saturation levels on a vocal track. The song we’re using has four different sections where the vocals are: An intro, a verse, a prechorus and a chorus.
Like Tony did in the video, the saturation plug-ins used in these examples were all used on insert slots of the tracks they were effecting. Keep in mind, however, that you can also use saturation as a parallel effect, by putting it on an aux track and sending audio to it through a bus. Like with compression, the advantage of parallel saturation is that you can mix it in along with the unprocessed audio, which can sometimes allow the transients to come through more.
For the first example, you’ll hear only the lead vocal track on the intro section (“I’ll never give up, I’ll never give out,” etc.). So that you can compare the vocal with and without the saturation, the effect is bypassed for the first four measures. On measure five, when the line repeats, you’ll hear Soundtoys Decapitator, on a relatively light setting that functions to fatten the vocal up a little more.
Decapitator is a versatile saturation plug-in that can do everything from light saturation to heavy distortion. For the latter, pressing the Punish button kicks the distortion into a higher gear.

The setting on Decapitator for the intro lead vocal.
The following section you’ll hear is the verse. This example will play twice: The first time without added saturation and the second time with Softube Saturation Knob providing some subtle buzziness, just to add a little more character.
In the next example, you’ll hear the prechorus, first, with no added saturation (you’ll notice that this section has heavier delay on it). When it repeats, McDSP’s FutzBox plug-in was used to create a band-limited telephone vocal-style sound that’s also heavily distorted.
FutzBox is a unique effect that makes it sound like your source is coming through the speaker of one of a variety of devices from cell phones to walkie-talkies to guitar amps to car radios and many more. You can also add distortion, filtering, EQ and noise generation to complete your sound. Here, the setting simulates a megaphone and adds in saturation and filtering that limits the signal to between 578Hz and 14.5kHz.

The effect on the vocal in the prechorus features the simulated sound of a megaphone.
The chorus vocal uses Saturation Knob with the same setting as on the verse, but at the very end, the saturation amount is automated to increase by several dB in a linear fashion during the last word, in order to give it more power. Simultaneously, the vocal track’s volume is reduced a bit to keep the saturation from boosting up the level too much.
This time you’ll hear it only once, with Saturation Knob on the whole time. When the vocalist sings the word “In” the last time, holding it for a couple of measures, you’ll hear the saturation increase via automation.

The automation for the saturation level goes up during the the last word.
Finally, here are all the sections together with the instruments and background vocals in.