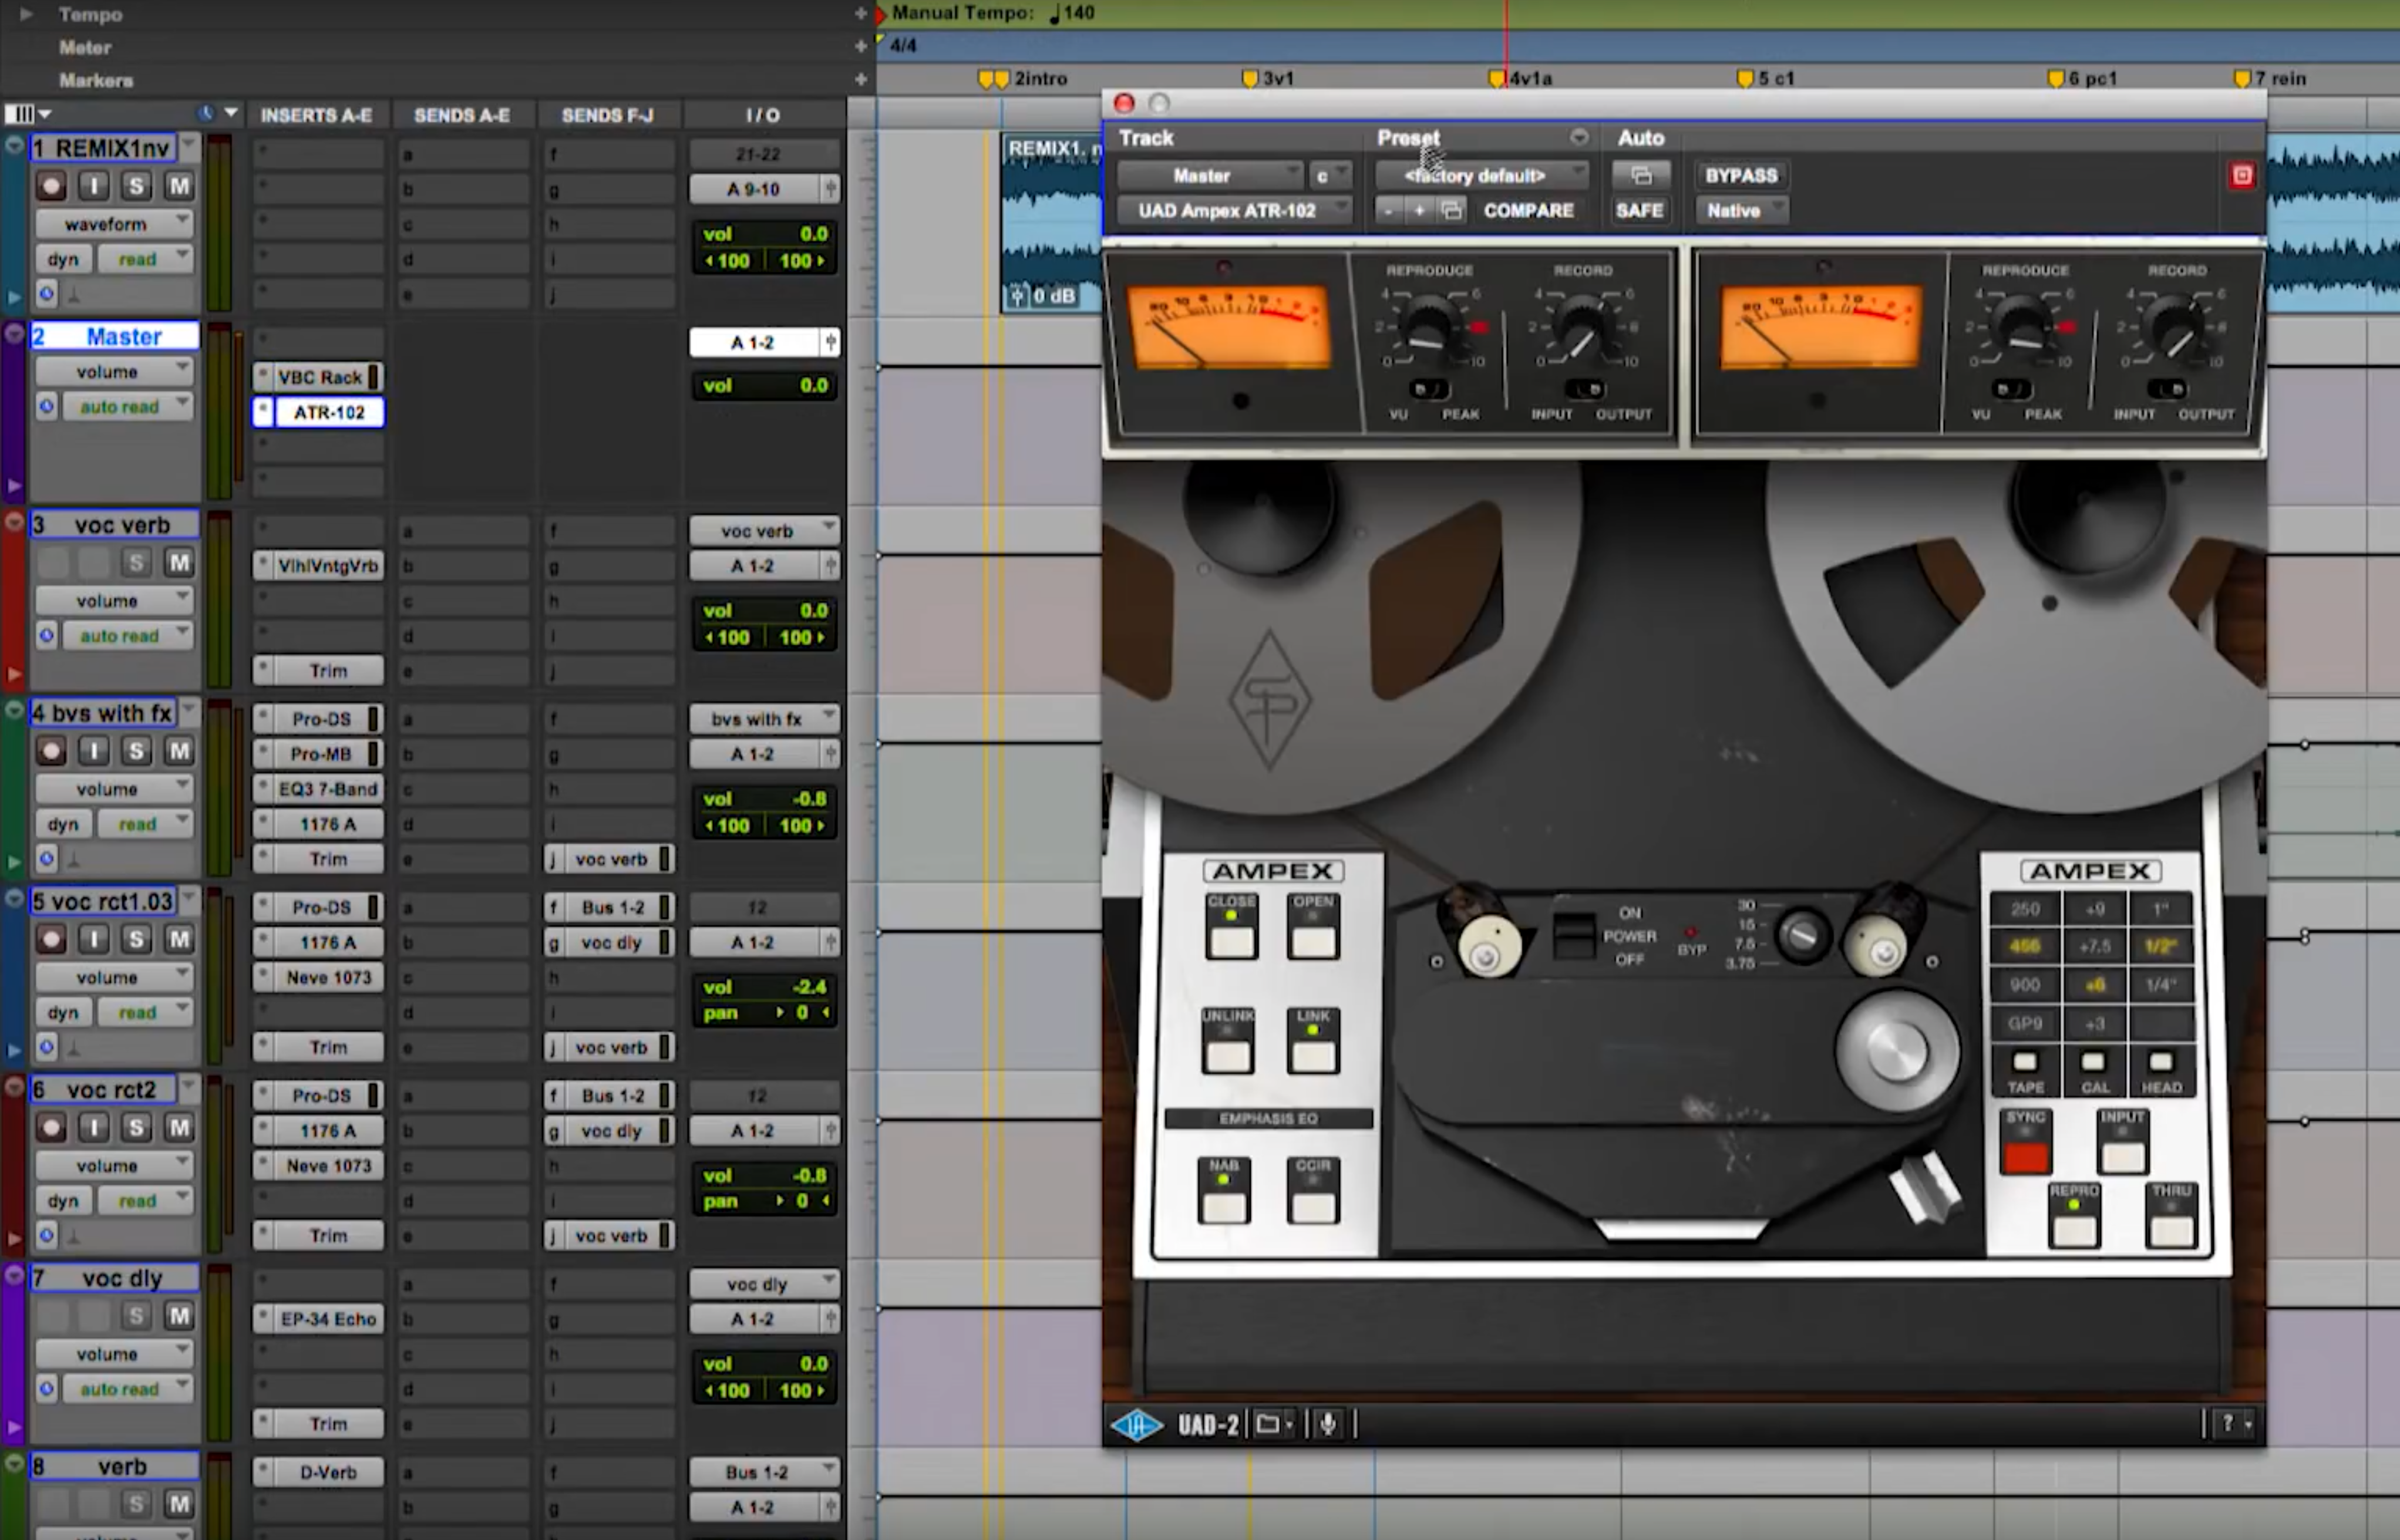
In this excerpt from the video “Darrell Thorp Mixing Future Elevators," Thorp discusses how he uses tape-emulation plug-ins. He explains that the one he uses the most is the UAD Ampex ATR-102 plug-in. The actual ATR-102 tape machine is a super-high-end 2-track recorder that Thorp refers to as “the machine of machines," especially for mixing.
If you had the actual tape machine, you’d mix into it, but with a tape emulation plug-in, the easiest way to get a similar sound is by inserting it on the master bus. Thorp says he once compared the UAD ATR-102 to the actual machine and was extremely impressed with the plug-in’s performance.
In this excerpt, Darrell Thorp shows how he uses tape saturation plug-ins on the master bus when mixing.
DRILLING DOWN
Thorp demonstrates how he’s using the plug-in on the Future Elevators mix. He inserts it on the master bus of his Pro Tools session, in the slot after the Slate Virtual Mix Bus Compressor (VBC).
He sets the Tape parameter to GP9, which emulates Quantegy GP9 magnetic tape. Each tape brand and formulation had a slightly different sound, so it’s a powerful feature on the plug-in to be able to switch between its four different tape-type emulations at the press of a button to compare their effect on the audio.
That’s one example of how a plug-in emulation can be superior to the original. To do a similar comparison on an actual tape machine, even if you had all the different tape types at hand would be impossible. The process of switching from one reel of tape to another can take a couple of minutes. With that much time in between, a comparison would be much less useful.
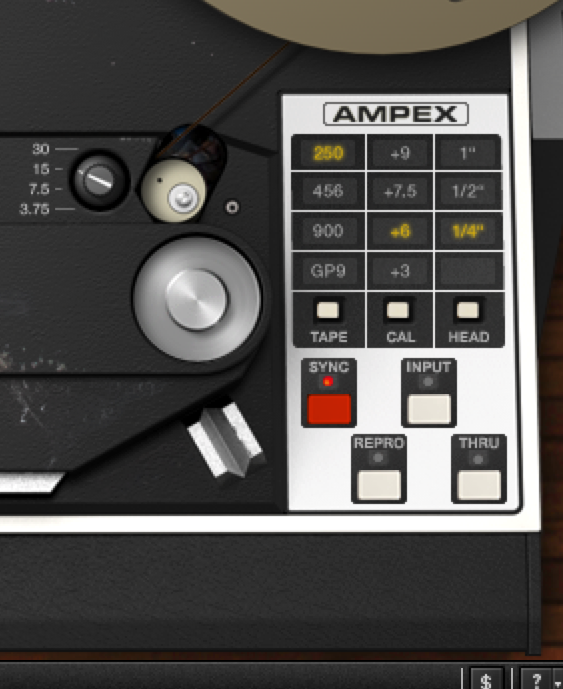
Here’s a closeup of where you choose tape speed, width, type, and calibration on the UAD ATR-102 plug-in.
In the video, Thorp sets the Cal level +6 dB. Tape machines can be physically calibrated to match the output-level characteristics of particular tape type, which are all a little different. The +6dB setting is the default on the plug-in.
Some engineers would “under-calibrate" a tape (which would correspond to a lower setting on the plug-in) to create extra headroom. Some would want the opposite effect, to get more tape distortion. Since all it takes is a button push in the UAD ATR-102 to change the Cal level, it’s easy to experiment with different levels, if you want.
SPEED DEMON
Thorp sets the tape width to 1/2". The hardware ATR-102 had a changable headblock that allowed you to switch between 1/2" or 1/4" operation. On the plug-in you select from three tape widths: 1", 1/2" or 1/4".
Next, Thorp plays the mix and compares the sounds of two of the four onboard tape-speed choices on the plug-in: 15 ips (inches per second) and 30 ips. You could make a very loose comparison between tape speed and the sampling rate in digital recording. The faster the tape, the more information is captured per second of recording time, leading to better quality.
For that matter, you could extend the analogy to include tape width, which is loosely analogous to bit depth. The wider the tape, the more information it's capable of capturing per second, therefore reproducing in greater detail, similar to how higher bit depth gives you more resolution.
That said, Thorp says he doesn’t like mixing to 1" tape, which he refers to as “TMI," for “too much information."
For the song Thorp is working on, he likes the sound of 30 ips better than 15 ips. He says the 30 ips setting sounds tighter on this mix and adds a little bit of energy. He points out that 15 ips typically adds a little bit of low end, but for this song, he doesn’t need that.
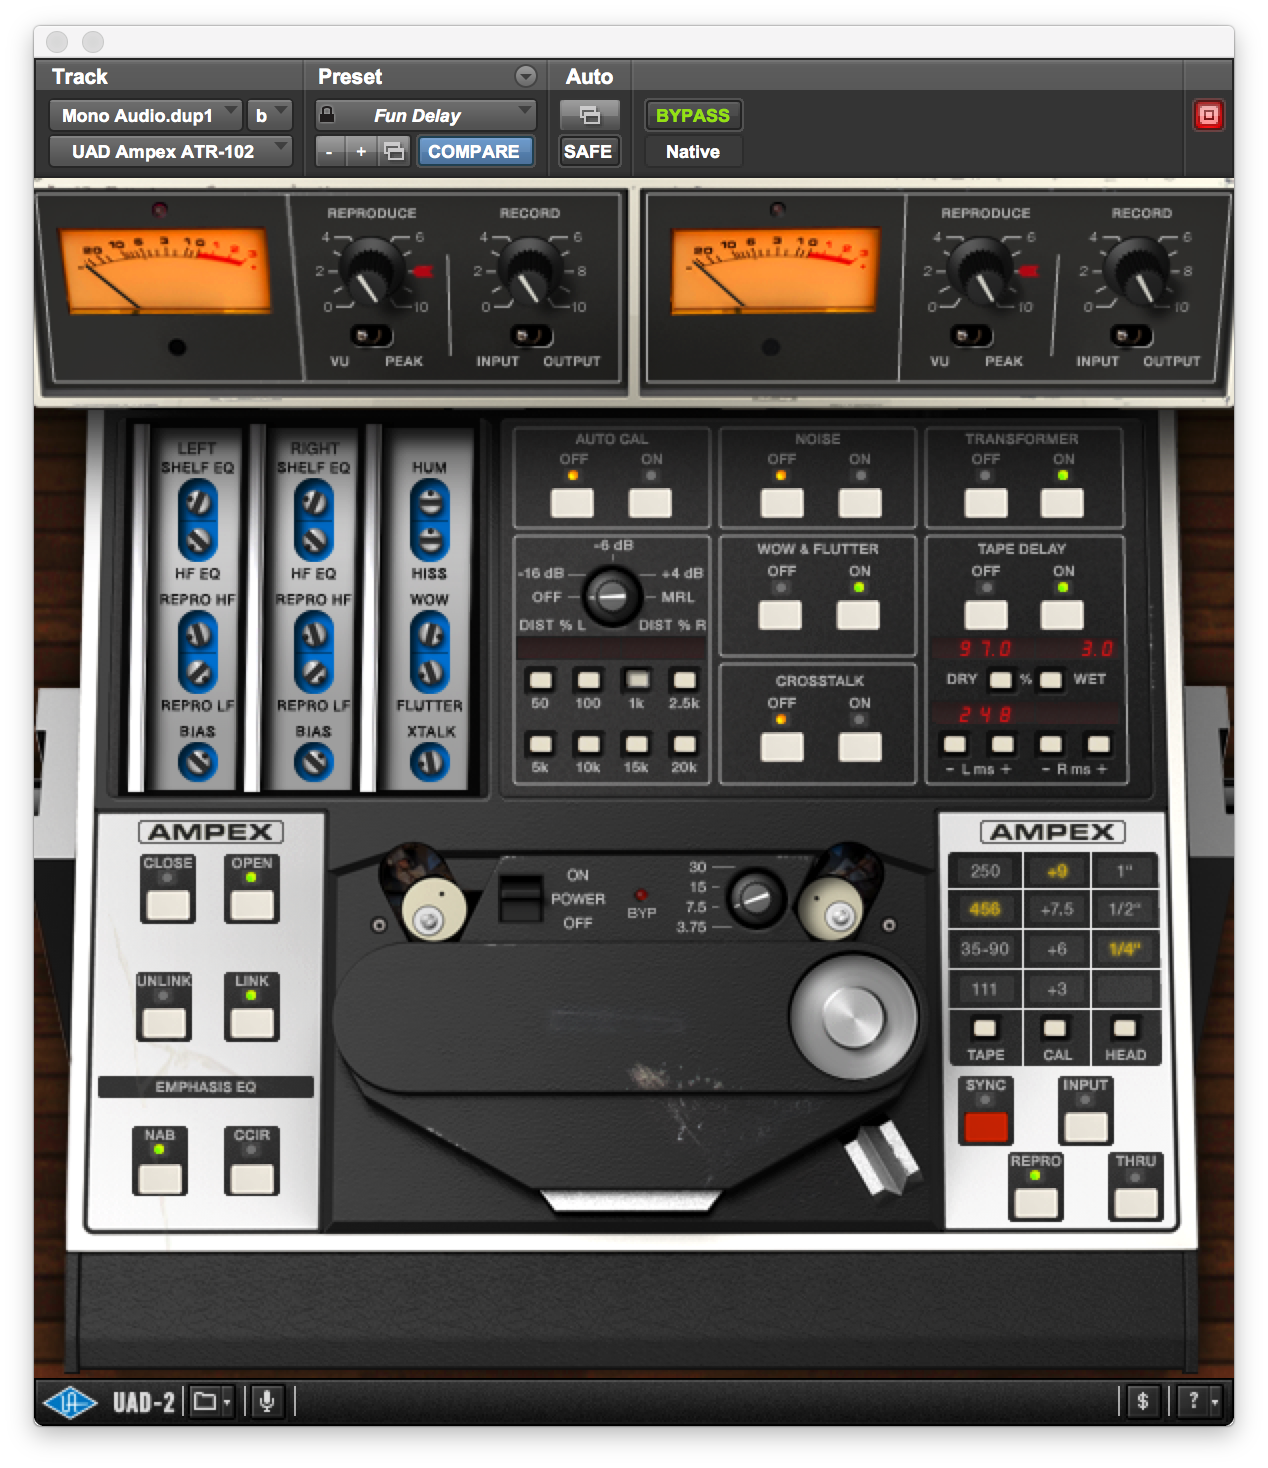
A deeper set of parameters can be revealed by pressing the Open button on the ATR-102 plug-in.
In the heyday of tape, 15 ips was the favored setting for rock mixes, because it’s a bit more crunchy and not quite as pristine as 30 ips. On the ATR-102 plug-in, you can go even lower, with 7.5 ips and 3.75 ips settings. At the ultra-slow 3.75 ips setting, you can create a noticable “low-fi" effect.
Pressing the Open button on the ATR-102 plug-in reveals an extended control set, where you can adjust a number of other parameters, one of which is the built-in Delay effect (which was not on the original machine).
ONE TRACK AT A TIME
Naturally, you can use tape emulations on individual tracks as well as full mixes. One area that benefits significantly from tape sound is drums.
Example 1:
Here’s a drum kit playing a four measure part, which you’ll hear two times. The first time has no effect; the second has the ATR-102 plug-in set to 3.75 ips. Notice the difference in the snare, which is crunchier with the tape saturation effect.
Example 2:
The first time this guitar part plays it has no tape effect. The second time, it has the UAD ATR-102 with the Speed set at 15 ips, and both the Record and Reproduce outputs turned up, creating an accurate emulation of a tape delay with a slap setting.