File management for your DAW projects isn’t as sexy a subject as compressing vocals or mixing drums, but it’s just as critical. It’s hard to truly appreciate how important it is to be organized with your data until you’ve lost a vital piece of audio for a project.
In this excerpt from the video “John Paterno Template,” we pick up with Paterno showing how he imports audio files into his Pro Tools template for a song he’s mixing (“I’m Not Your Cowboy” by Roger Manning), and he touches on some file-management topics along the way.
If you watch the full video (which you can do if you’re a Puremix Pro Member), you’ll see that by this point, he already has all the parameters set in the Pro Tools session file he created for the song (which originated from his mix template) including the correct tempo, the bit depth, sample rate, file type (interleaved or not), etc.
Do You Copy?
To get things started, he opens up the Import Audio dialog box, which is under the File menu in Pro Tools but can also be accessed with the key command Shift+ CMD+l. He explains that he’s choosing the Copy option so that Pro Tools will actually copy all the audio files into the Audio Files folder of the new session. That way, it’s much less likely that a file will get lost down the road. He locates the folder containing the audio files he wants to bring into his session, selects them all and then clicks Copy.
The Import Audio dialog box offers another option called Add, which doesn’t copy the files, but simply registers their location so that Pro Tools can access them. The danger of this method is that if somehow that folder in which the original-session audio files reside gets moved or accidentally deleted (or one of those audio files in the folder gets moved out or deleted), Pro Tools won’t know where to find them, so they won’t be able to play back.
When Pro Tools can’t find a file, you get the dreaded Missing Files dialog box. When that happens, you have to search for those files and “recommit” the links to your Pro Tools session in order to play that audio. It’s a tedious and annoying process, so it’s best to avoid it if at all possible.
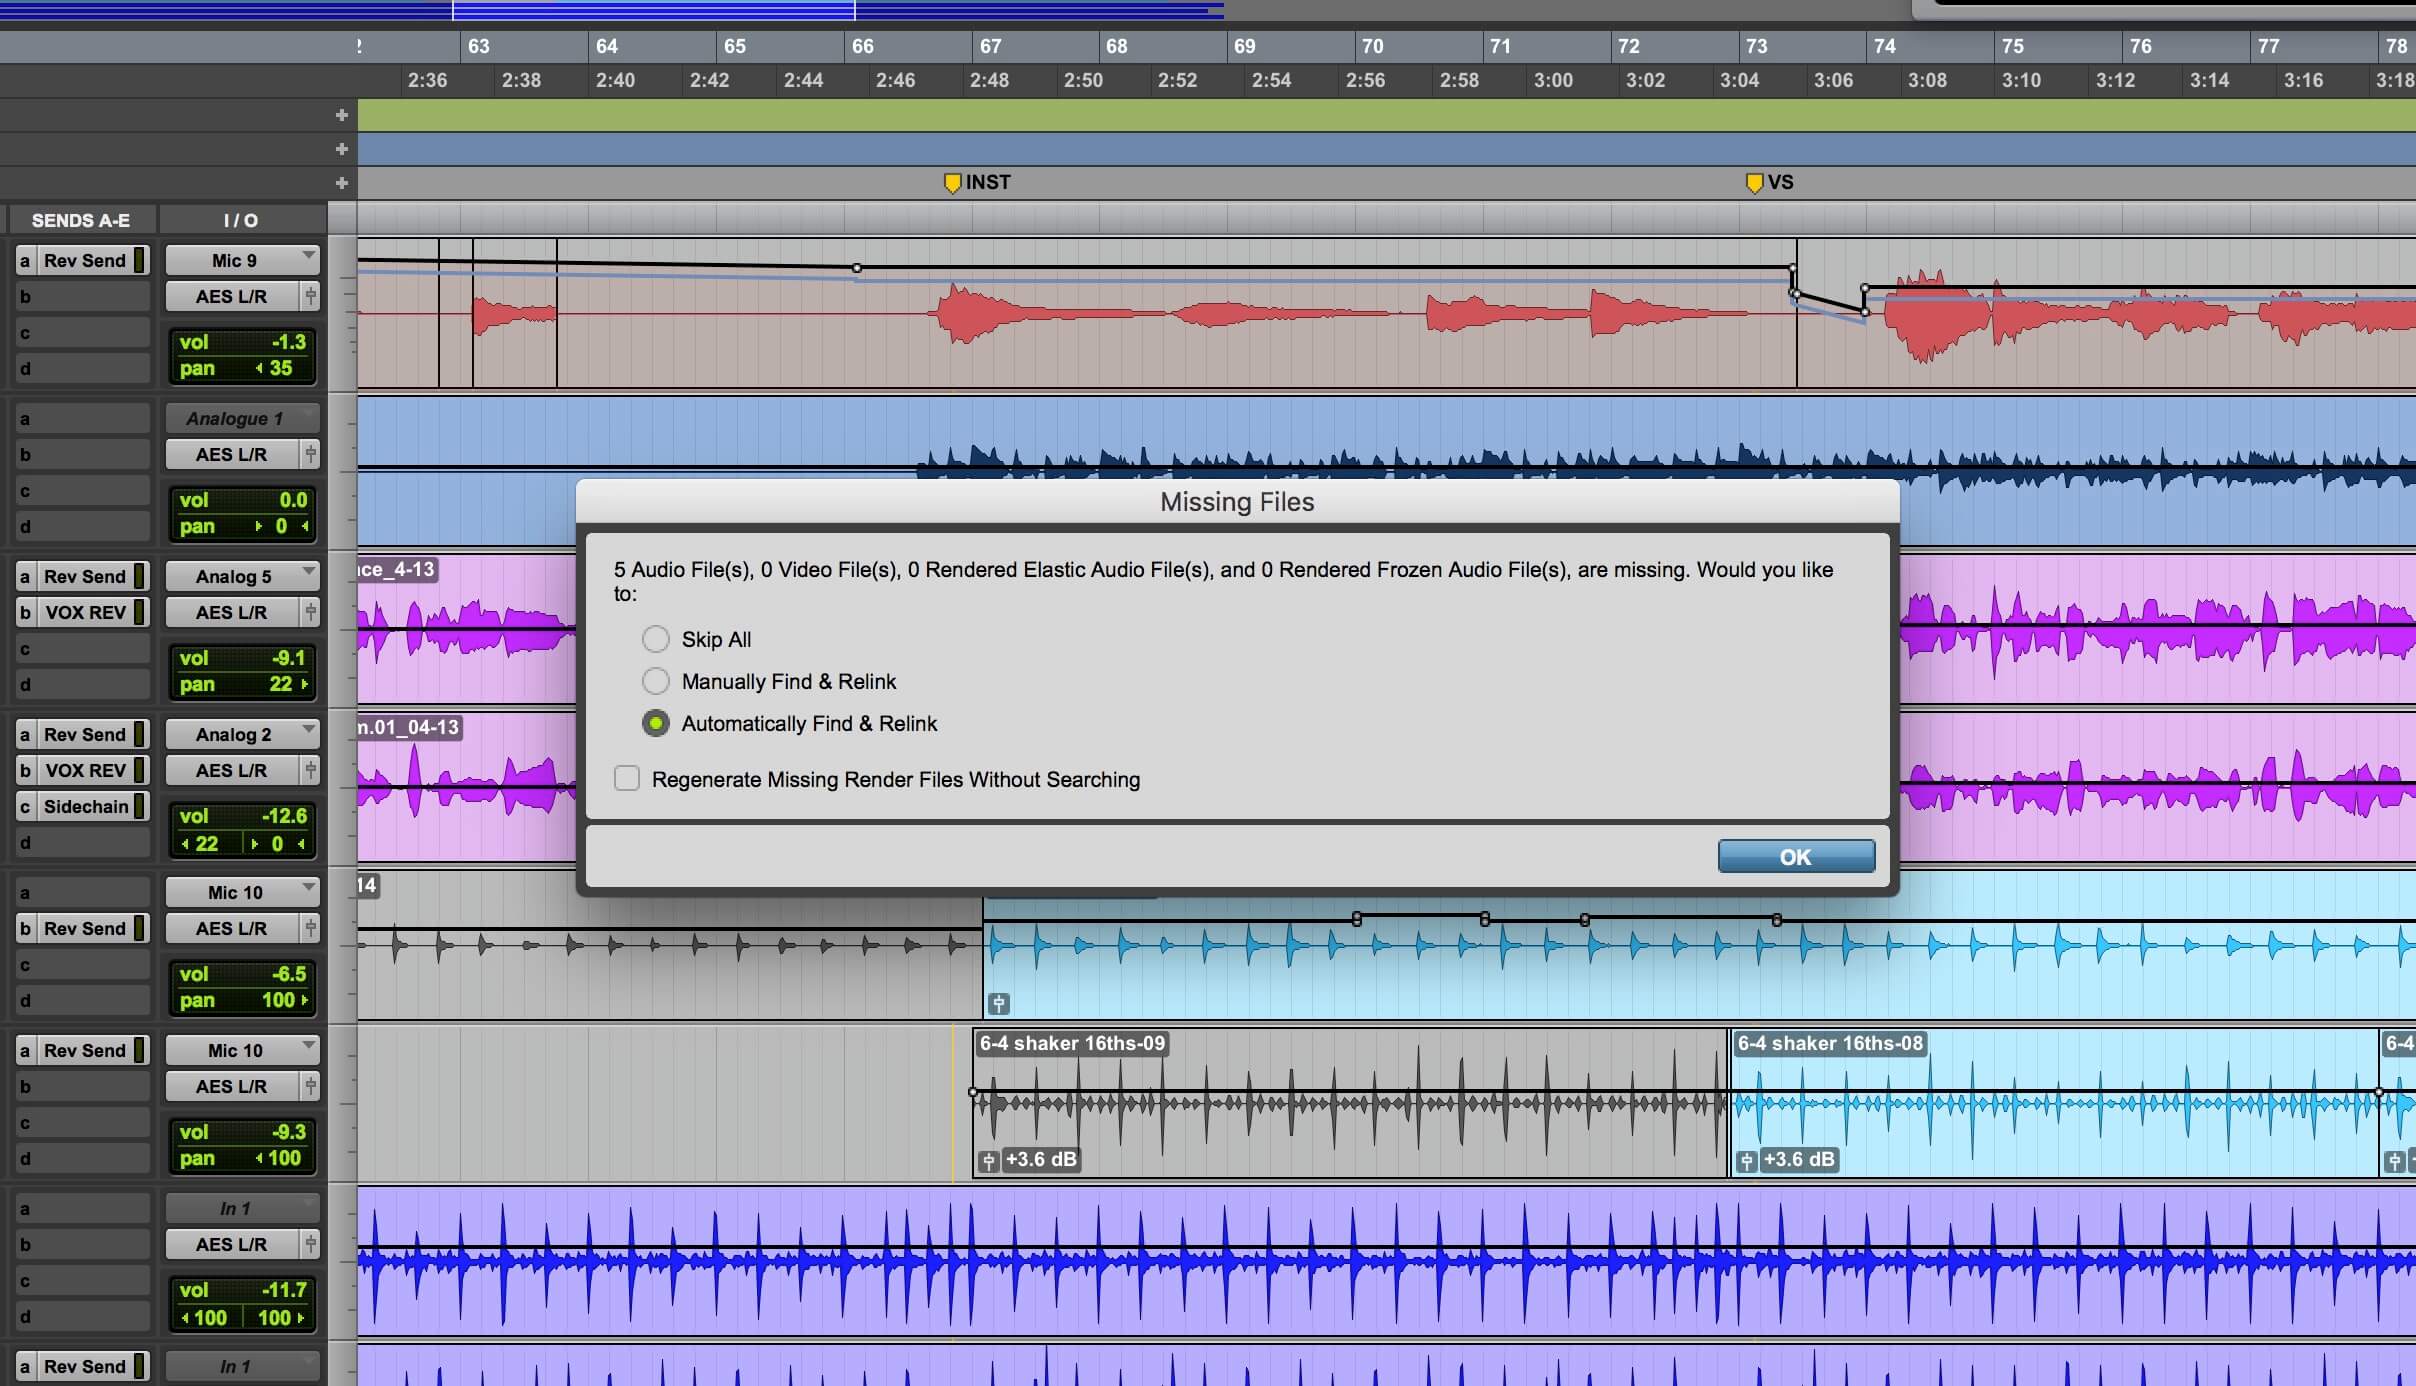
If you have missing audio files, Pro Tools will show you this warning when you open the session.
There’s another caveat to using Add instead of Copy. Let’s say that after you created the new session you decided to record some additional files into it, or simply consolidated or committed some files within it. Those new files would appear in the Audio Files folder of the new session. At that point, you’d be working with a song that has its audio files spread over more than one folder: the original folder that you “added” from and new session’s Audio Files folder. What could possibly go wrong? (Hint: a lot.)
Many DAWs offer similar copy options, but Pro Tools seems particularly finicky about the location of its files and folders. If you move a session to a new location by merely copying the files and folders—and you don’t use Pro Tools’ “Save a Copy In” option, Pro Tools may lose track of where the audio files are.
Back to Paterno, he points out that because the files in the Roger Manning session are at the same sample rate, 48kHz, as his session template, Pro Tools can copy them directly into the Audio Files folder. If the source files were at 44.1, he says, then the Copy option is also ideal, because it would automatically sample-rate-convert them to 48kHz.

If you try to Add files at the wrong sample rate, you’ll get this dialog box.
What’s Your Destination?
After explaining about these choices for moving the files into new session, Paterno hits Done to start the copying process. He’s then prompted for a destination folder, which, by default, is the Audio Files folder for the new session. After he initiates the copying process, Pro Tools automatically opens the Audio Import Options dialog box, which offers two destination options for the imported audio: New Track, which puts each of the copied files onto a new track; or Clip List, which puts them in the Clip List, Pro Tools’ audio “bin” as it were—the list of files in the session.
Actually, even though Paterno chooses the New Track option, the files still end up in the Clip List, because all files that get imported into a session do. Files that come into the session via the Add command will not show up in the Audio Files folder but will be listed in the Clip List.
By choosing New Track, Paterno doesn’t have to create tracks manually and then drag the audio from the Clip List to the new tracks. It all gets done automatically. He explains that the new tracks are added below the lowest highlighted track in the Edit Window. (If you’re in the Mix window, the track will appear to the right of the highlighted track.) Although you can always rearrange the track order later, understanding the role of a highlighted track saves you having to do that.

Because the Track “Bass.03” is highlighted, the new track will be created directly below it.
He also needs to choose where in the timeline all the files will start. Although typically one would set the tracks to start at the Song Start location, which is bar 1, beat 1, tick 000 (1/1/000) by default, Paterno chooses the “Selection,” from the pull-down menu in Audio Import Options. This will place the audio for the new tracks at the bar/beat/tick location that his Pro Tools transport is currently at (or at the beginning of a timeline selection if there is one).
There are several other options for placing the new track: “Session Start” puts the file at 1/1/000 (bar 1, beat 1, 000 ticks). “Song” puts it at the Song Start position but is grayed out unless you’ve changed that position from its default of 1/1/000. “Spot” lets you use the Spot Dialog for placing the track or tracks you’re importing to a specific timeline location.
Paterno chooses the Selection option. His transport is set at 9/1/000, so that’s where the all the imported tracks start when they appear in the Edit window. In the full video, he explains that, for him, it’s easier to do it this way in case he decides to add something before the downbeat (beginning) of the song. If he starts everything at bar 1 and then decides to add an additional intro or pickup, he’ll have to slide the rest of the tracks over to make room. This way he’s got extra space built in.
It’s All in a Name
Another file-organization issue to think about when working in Pro Tools or any DAW, is to make sure you name your tracks before you start recording to them. Otherwise, your audio files will have generic names like Audio.01, or Audio.02 and will add a lot of confusion when you’re looking at the Clip List or its equivalent in another DAW. Having generic file names will also add a lot of confusion if you’re trying to find a specific track. It’s much better to have files starting with Guitar or Bass or Snare or Lead Vocals—something descriptive. When you’re anxious to get started recording something, it’s easy to forget the track-naming step, so try to ingrain it in your workflow.
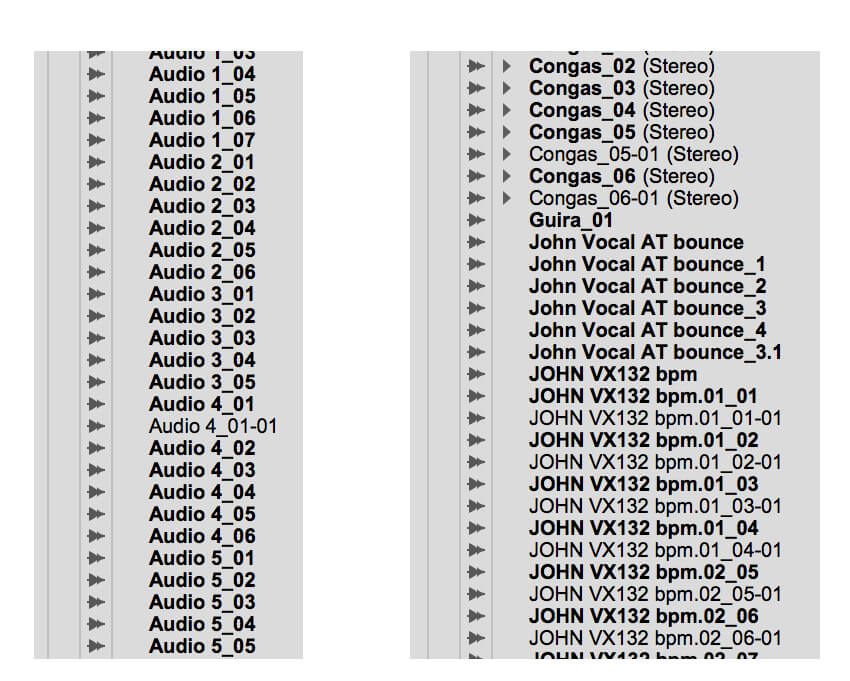
Here are excerpts from two Clip Lists from two different sessions. For the session on the left, the tracks weren’t named before recording. For the session on the right, they were.
If, for some reason you do forget, there’s a fix that will help you, which is to consolidate (merge) the files in the track or tracks on question into a single audio file (per track), and name them with the name of the instrument or vocalist (the key command to consolidate regions is option/alt + Shift + 3). You’ll still have some generically named files in your folder, but now, at least, any files you create from that track going forward will be correctly named, and you’ll have a complete take of the track with the right name in the Audio Files folder and the Clip List.
Safety First
As long as we’re talking about files, we should also touch on the issue of backup. Yes, Pro Tools and other DAWs make Session File Backups, which are handy to have, but those are backups of the session file, not the audio files, and they reside in the same session folder as your audio files. So, if that drive were to go down (which any drive can do at any time), you’d lose the original and backup session files and your audio files. The Session File Backups are mostly useful for going back to older versions, rather than as safety for data loss.
So, it’s absolutely imperative to create some sort of backup strategy that you use consistently for your recording data. Backup experts say that, at a minimum, you should have at least two different backups, one on a separate drive and one offsite. The former isn’t difficult, you just copy your entire session folder to a backup drive when you’re finished working on it for the day (or night). Making an offsite copy is also easy if you have cloud-based file storage. Copy your session folder to the cloud at the end of the day, as well.

A backup application such as Econ Technologies ChronSync helps you keep your backups consistent and can help you avoid accidentally overwriting a new file with an older one.
In either case, be careful that you’re copying the record drive to the backup, not vice versa, or you could wipe out everything you did that session. Using backup software can help, as you can save a backup configuration with the primary drive copying to the external backup and one to the cloud backup. You can open these and run them each time you want to do a backup, and you’ll never get it wrong.
You can also program backup software to run backups automatically. If you go with this option, check it periodically, as backup applications have been known to not run scheduled backups every time they’re supposed to.