Mark Needham creates a fairly involved lead-vocal effects chain for the song “In the Middle,” in this excerpt from the video “Mark Needham Mixing Mona.”
DE-ESSING SANDWICH
Needham starts out with a de-esser, which, for those unfamiliar, reduces sibilance (“sh” sounds) that can plague vocal tracks in a mix. A de-esser is like a specialized compressor that clamps down only when it detects sibilant frequencies. In this case, Needham starts out with a FabFilter Pro DS de-esser plug-in, set to Wide Band mode. That means that when it detects sibilance, it attenuates across the entire frequency range. He experiments with the Threshold setting until he gets the amount of de-essing he likes. You can see the red gain-reduction display light up whenever the de-esser kicks in, attenuating about 4dB each time.
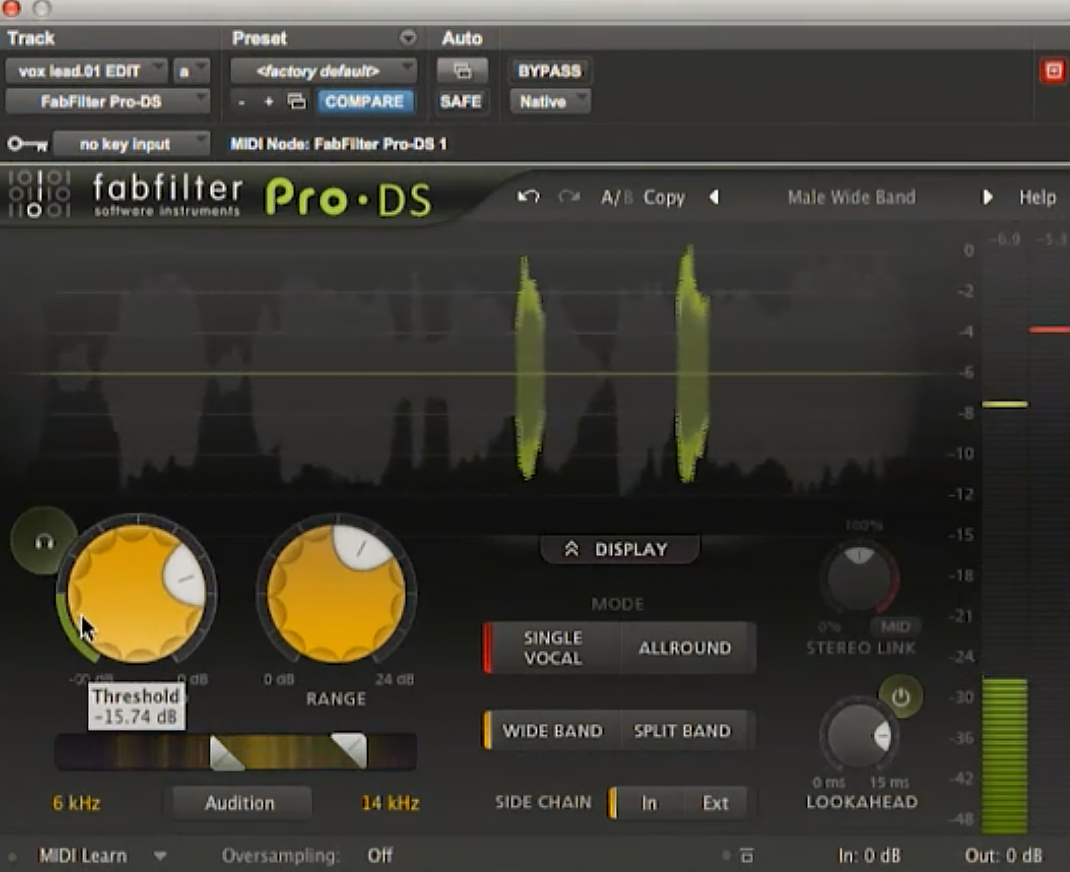
The FabFilter Pro DS is one of two de-essers used by Needham on the vocal track. The green shaded areas in the waveform display indicate where de-essing has occurred.
Next, he adds compression with a Waves CLA-76, which is a Urei 1176 emulation that Waves developed in collaboration with mixer extraordinaire Chris Lord Alge. Needham sets the ratio to 4:1, the Attack time to its mid point and the Release time to its fastest setting. Note that the Attack and Release settings on an 1176 (or 1176 emulation) are opposite what you’d find on a standard compressor. That is, the fastest settings are achieved by turning the knobs clockwise and the slowest counterclockwise.
Even with the Input and Ratio set relatively low, he’s getting a fairly significant amount of gain reduction because the vocal is coming into the compressor at a pretty hot level, and the amount of compression on an 1176 is governed not by a standard threshold control, but by the input level control. The hotter the input, the more compression.
Needham then adds a UAD Precision De-Esser. Why two de-essers? He explains that since he’s using a fair bit of compression, and he’s going to be adding a little distortion, he needs to be careful about sibilance. He sets the UAD de-esser in a “split-band” configuration, which means that only a user-selected frequency range in the track will get attenuated when the plug-in detects sibilance.
EQ TO FAUX PROXIMITY
In his quest to make the vocal sound more aggressive, Needham next inserts a Waves SSL E-Channel channel strip, to use its EQ section. He boosts just under 3dB at three different frequencies: 8kHz, 4kHz and 2.5kHz. When he plays it back, it’s definitely brighter.

Here is the setting Needham uses on the UAD Pultec-Pro EQP-1A (Legacy) to create a faux proximity effect.
Needham then inserts a UAD Pultec-Pro EQP-1A (Legacy) equalizer, which he’s using to add the sound of the proximity effect to the vocal. If you’re unfamiliar with the proximity effect, it’s a phenomenon that occurs with most mics (the most notable exception being omnidirectional models) where the low-frequency response is boosted when mic is positioned close to the source. Vocalists often take advantage of the proximity effect to make their voices sound more full.
To achieve this artificially, Needham sets the EQP-1A plug-in to boost and attenuate equally at 100Hz. It’s a bit counterintuitive, because you’d think that boosting and cutting by the same amount wouldn’t have much net effect, but the result is a pretty close emulation of the proximity effect. You can try this yourself to see how it affects your voice or a voice you’re mixing. If you don’t have an EQP-1A plug-in, you can use another EQ, and set two bands to 100Hz, with one boosting and one cutting.
HEADS WILL ROLL
Next, Needham adds yet another processor to the vocal chain. This time he inserts a Soundtoys Decapitator, which is a saturation and distortion plug-in. The Decapitator is a pretty versatile processor that can be set to achieve everything from slight overdrive to heavy saturation. It even has a button called “Punish” that kicks the whole plug-in into overdrive (no pun intended).
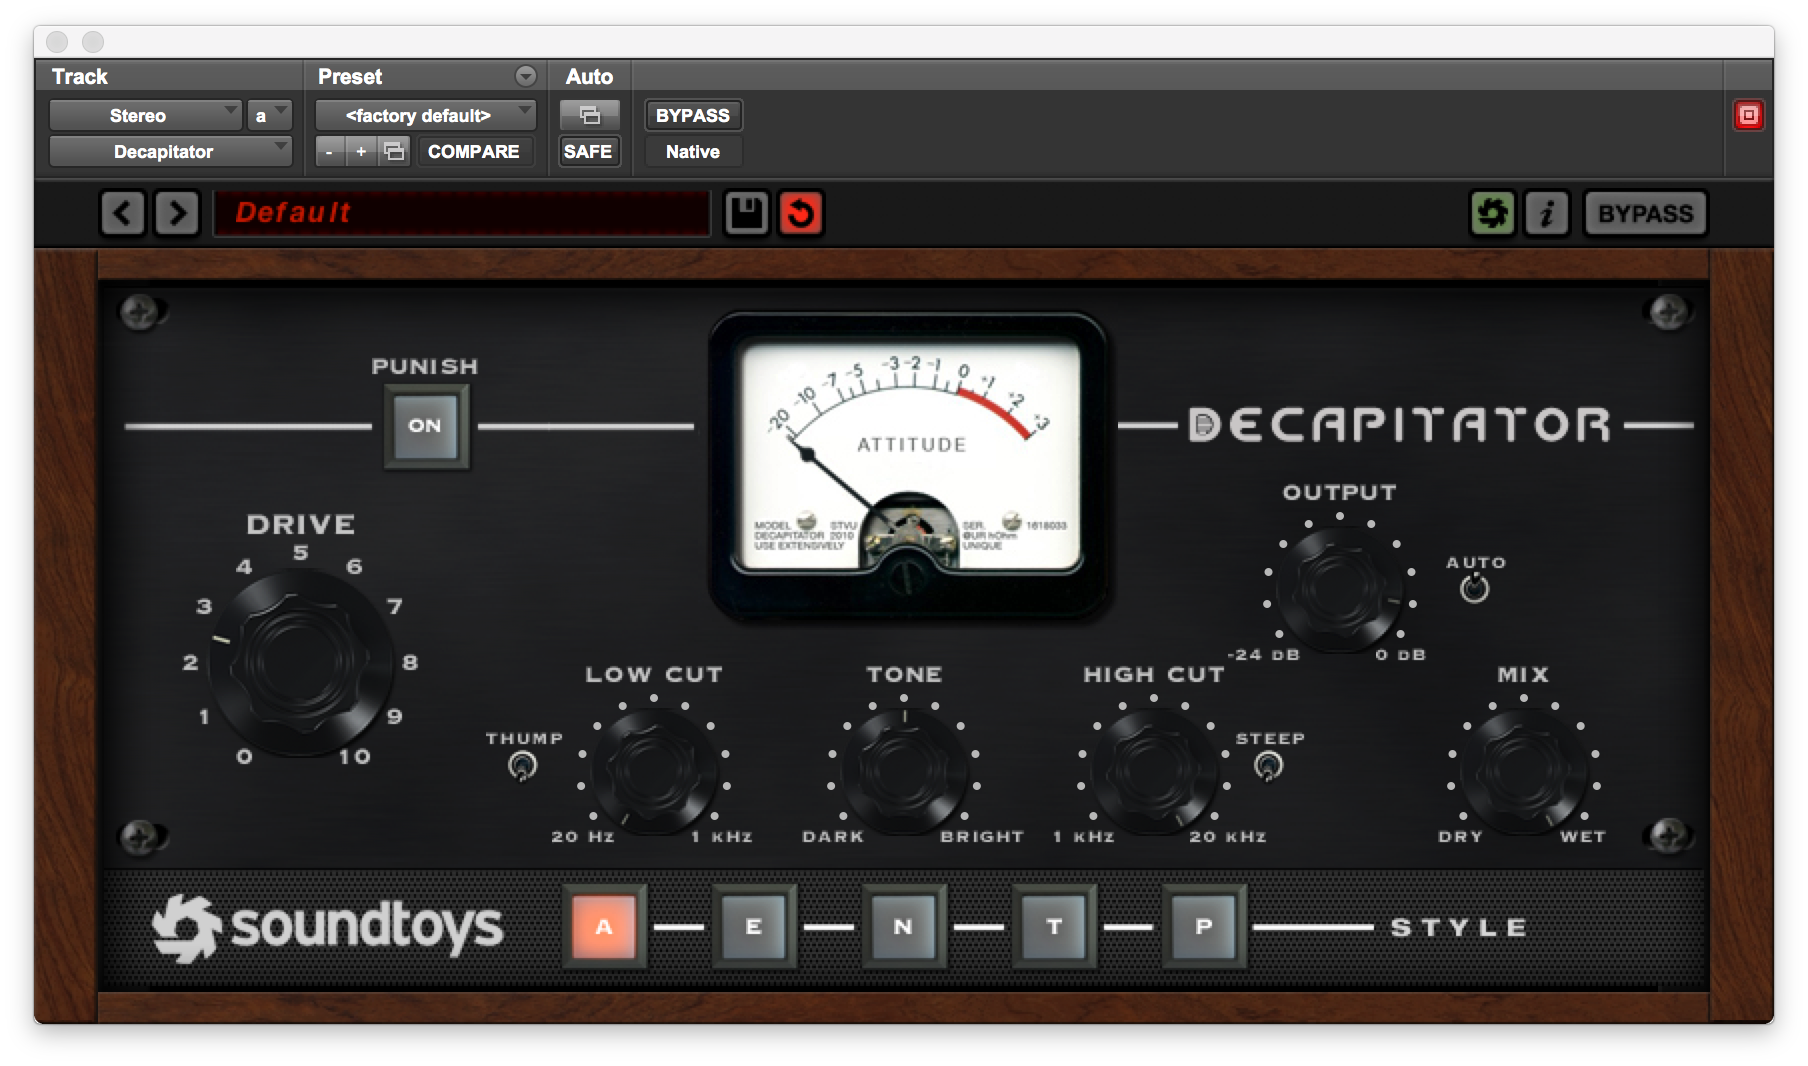
Needham uses the Soundtoys Decapitator plug-in, set like this, to add a hint of edgy distortion to the vocal.
Because it’s a vocal track, Needham opts for a relatively subtle setting, turning the Drive control to 3 (with the Punish button off), which gives the vocal a little more edge. He leaves the rest of the parameters at their default positions.
VIBEY VERB
The next step is to add some reverb, and Needham opts for the Relab Development LX480 a Lexicon 480L reverb emulation. He doesn’t insert it, but instead puts it on an auxiliary channel and sends signal to it from the track using an aux send. By configuring it that way, he’ll be able to route other tracks to the same reverb by using their aux sends.
He sets the reverb to a snare plate setting with a RTM (reverb time) setting of 2.40 seconds and a Predelay of 104ms. The LX480 sounds exceptionally smooth and adds considerable polish to the vocal.
JUST FOR INSTANCE
The following are audio examples related to the effects and settings used by Needham in the video excerpt.
EXAMPLE 1: Listen to the proximity effect on a spoken word vocal. As the speaker gets close to the mic, the bass and volume increase.
EXAMPLE 2: Needham’s “proximity effect with EQ” technique is demonstrated here on a spoken word vocal. With no instruments to mask it, you can clearly hear the impact of the technique.
EXAMPLE 3: This features a line from the chorus of the Mona song “In the Middle” that Needham mixed in the video, processed with a similar vocal chain. The vocal repeats two times. The first time, the Soundtoys Decapitator is set the same way as Needham set it in the video. The second time, the Drive knob—which controls the amount of distortion—is pushed up almost double where it was the first time, providing a more extreme vocal distortion. The higher setting does increase the sibilance a bit, despite the de-essers in the vocal chain.
EXAMPLE 4: Decapitator is great on a lot of different instruments, including drums. Here’s a basic rock drum loop that plays three times. The first time has no added processing. The second time, Decapitator is on with a moderate setting that gives the loop more character. The last time it repeats, the Punish button on Decapitator is turned on, causing a heavier distortion.