Some time ago I was asked to "narrate a mix" and put emphasis on the thought process and the workflow: keeping focus, handling revisions and generally making note of everything that brought me to the final mix. I realised more and more people wanted to know how something is finally branded as "completed" and how one can survive self-criticism. I thought this was a great idea and I told myself "one day I'll write a mix chronicle of something".
So what better occasion than a Zelab mixing contest, which is something most of you have already downloaded, mixed and listened to? Let's go!
2. THE SONG
 At the time of this article, we just released 'A Chaque Fois' by Clement Jacques for the new mixing contest. I am still waiting for Fab's mix to put on the page and I have not listened to the album release: it's the perfect time to work on it without influences. The song is raw, energetic, with a blend of noise and alternative rock. It doesn't use special effects or the weirdest sounds to achieve the kind of aggressiveness some industrial tracks have, instead it creates edge and grit through guitars, vocals and one synth-y bass sound. Great. I like the attitude. This kind of personality is rare. I make a note to purchase Clement's record.. but only after having mixed this song.
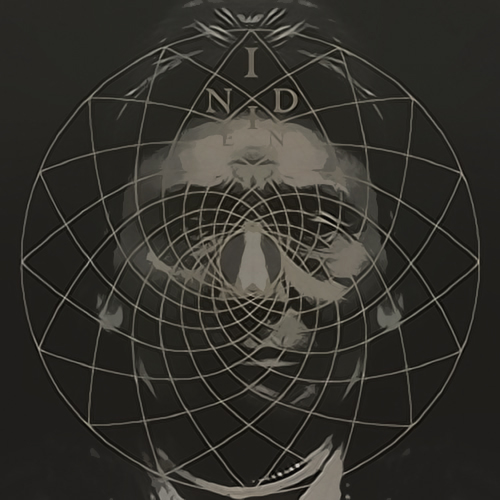
This song is from his album "Indien", produced by Greg Bonnier, mixed by Fab Dupont and released in 2014 by Music Mansion. It's available on iTunes, here.
3. DECISIONS
 My studio is in the middle of another mixing session, so my choices are limited. I can't just move the hardware and routing I've made for the scheduled band (I don't want to get killed) so I decide to make the entire mix in-the-box while still using analog summing and a couple pieces of outboard for the final touch. By listening to the track, I notice the song has two main moments: one with lead vocals singing, the other without. I immediately make the decision to turn the part with lead vocals into something that is angled and edged forward, centered and propelled at the listener. The part with background vocals is instead going to be quite wide and floaty, more watery and deeper. Then there is a third part which we could identify with the solos, but if I fail at making those two main parts interesting, no one will care about the rest of the mix.
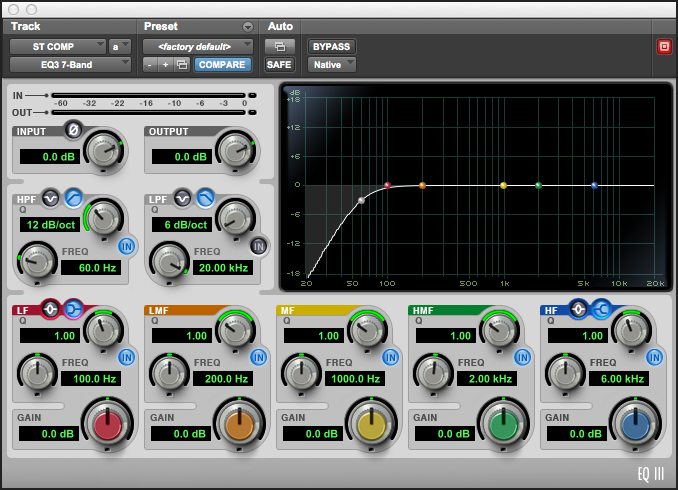
4. DRUMS
I see two bass drum microphones and immediately blend them into a single 'ALL KICKS' Bus. Same for 'ALL SNARES'. I start blending the two bass drum microphones and decide to ditch the Atlantis and keep the D112. I have a sound in my head and I know, from past times, that the beautiful, subby, full sound of the outside microphone will only give me problems for that. But..it's better to have it than miss it later, you'll see. My idea of drums for this song is to have something concentrated, not wide, that stays behind the vocals and keeps pumping rhythm, without being too aggressive.
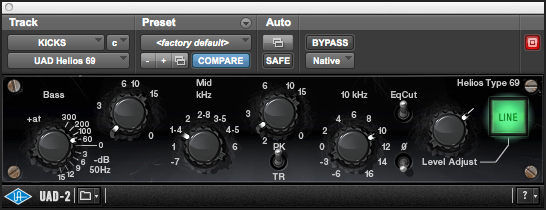
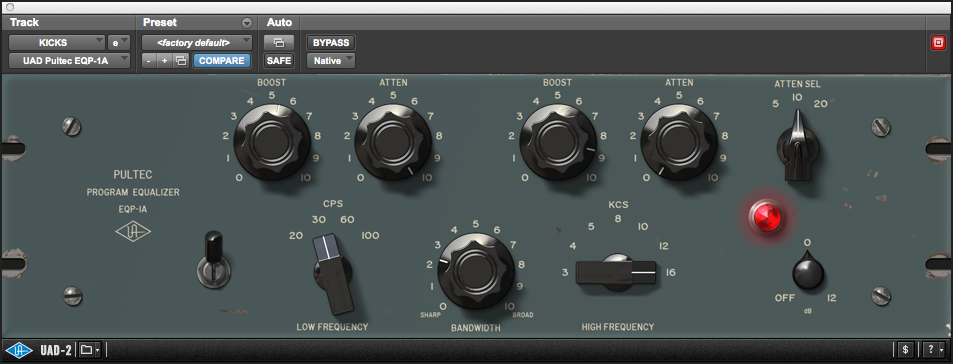
The bass drum is there but I need weight. No sub, just discrete and constant weight. For starters, I put an L2 maximizer on the inside of the kick and tweak it so I get a constant, 'no-matter-what' hit from the kick. Something I can count on as a foundation when things get busy. In other situations I would have never put an L2 straight away on the kick but this time I feel it's on par with my vision. Now, what about the outside of the kick? I decide to use it for all the air and the high frequency contour. This way I get the nice whistles and vibe of the Atlantis outside without interfering with the punch and transient of the D112 inside. Now, since the L2 brings up the whole kick, the bleeding goes up too, along with the tail. To keep on making things unnatural but bold, I gate the kick pretty hard (again not something I would do in other situations), then remove some of the low-mids and put a UAD Helios on it and take more stuff out, until I finally make it even bigger with some classic UAD Pultec EQ trick. And lots of 16k to add!
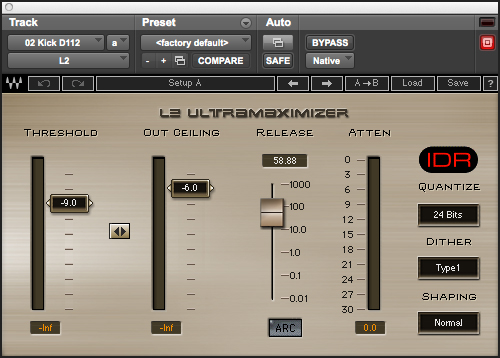
Bass drum (D112): Waves L2
Bass drum (Atlantis): PT EQ
Combined Bass drum:
UAD Helios 69 >
PT EQ >
UAD Pultec
Snare drum, once I blend the 451 and i5 microphones, I am happy. The trick this time is on the bottom mic, which gets an L2: I need this guy to be there at all times: the bottom is going to give me that HF content that will help define the snare and help it go through the mix. After the L2, I prolong the snare tail with some UAD AMS RMX16. I find this plugin amazing for this sort of tricks. I love the general vibe of the snare this way.
Than, more gating on the blended snare and a touch of Scheps 73 to give it more character.
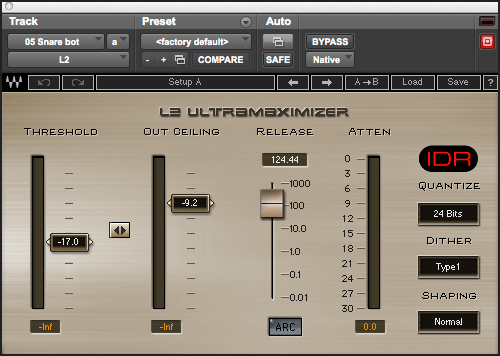
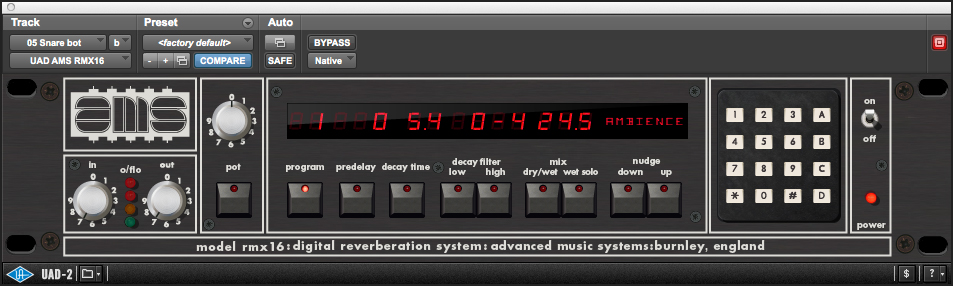
Snare drum (bottom mic):
Waves L2 >
UAD RMX AMS 16

Combined Snare drum:
Waves Scheps 73
Overheads and room now need to be tailored specifically for the kick/snare pocket. Sometimes I go the other way: overheads first and then integrate kick and snare..but not with the sound I have in my head: I need the two accents strong and then the overheads will add cymbals and overall air, while the room will provide the coherence and glue for the whole kit. As you can see, it's a simple EQ and more 1176. The one on the overheads doesn't even compress, but I need that add grit (something the Waves CLA-76 really has). I narrow the overheads pan and change the levels so that the two microphones are centered and not left- or right-heavy. I find that most of the drums I like in records are actually more compact than super wide spread.
Then, I add a good blend of room and for now, I mute the toms. I want to tune into the main groove. The tamborines get a rough EQ treatment (highs only!) and that's it.

Overheads:
PT EQ >
Waves CLA-76

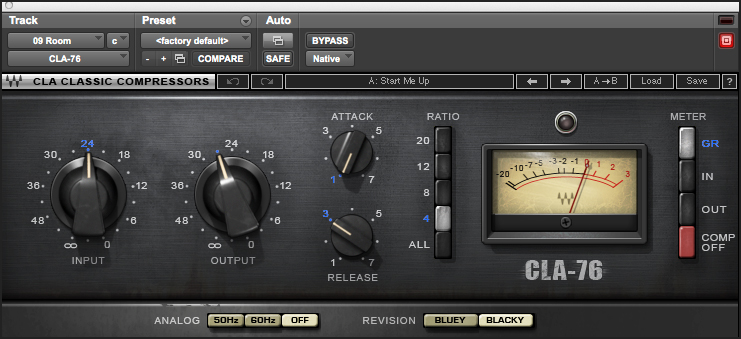
Drum Room:
PT EQ >
Waves CLA-76
5. COMPRESSION BUSSES
I tend to set some parallel processing busses straight away. One is mono and has a DBX 160 VU (the real one was being used in the 'real' session, but luckily I have the one from UAD). This is used to compress both kick and snare, in parallel. The other one is two separate mono channels. I don't want the left to know what the right is doing. Like with hardware, I tend to never use 'Link' for stereo units. One plus of analog gear is the width and depth it creates through correlation not being spot on. It's..'there', but that smidgeon of error adds a magic to the stereo image. So this bus is made of two 1176 compressors. I usually use Distressors for this but..guess what? Yes, taken. I set the 1176 to 'All buttons mode', slowest attack and fastest release. I didn't come up with these tweaks: they are just the easy way to an amazing 1176 sound. For now this bus will get mostly drum overheads and the room but with time it will be used by many other tracks.
(as of Day 1. More busses were added on Day 2 - see below)
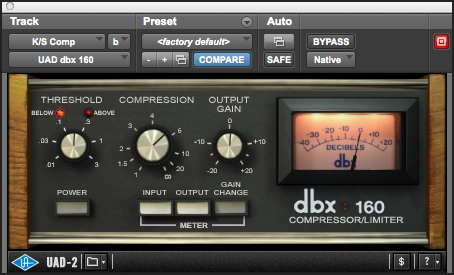
Mono Parallel Compression:
DBX 160 VU
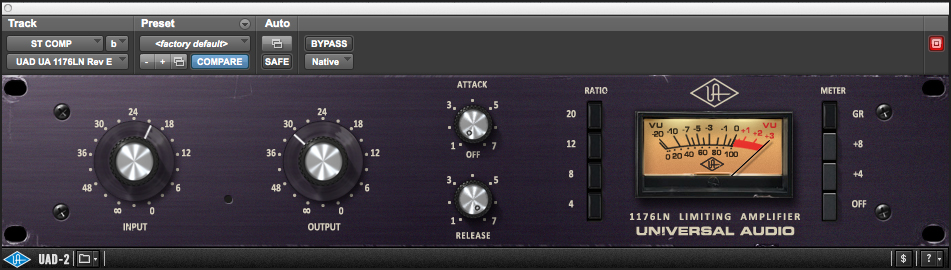
Stereo Parallel Compression:
PT EQ >
UAD (Dual Mono) 1176LN
(the EQ is used as a sidechain filter, a missing feature in the original 1176)

Mono Parallel Bass Compression:
UAD DBX 160 VU
6. BASS
I really like the sound of the bass, I don't know if it's a real bass super processed or a synth bass. In this case, I basically leave the sound as it is, merely enhancing some aspects. What I want to make sure is that kick and bass don't fight in the lows. I don't want the kick drum to be super low but I still need to make some space and make sure the bass didn't mask it. I also added some RenBass to add some 90Hz to give it more density.
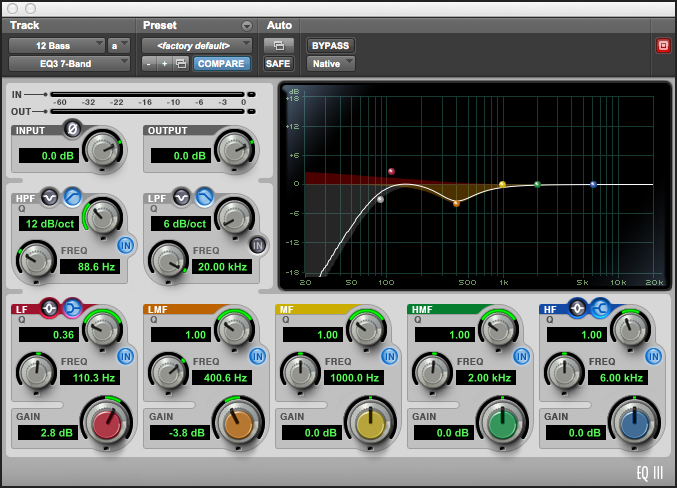
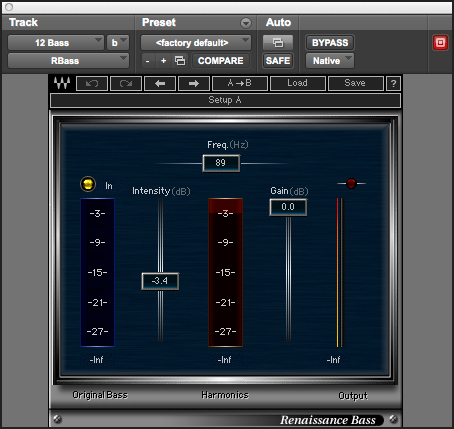
Bass:
PT EQ >
Waves RBass
7. GUITARS
On guitars I used the API Vision Channel by UAD. The saturation model in the input stage is just phenomenal. By driving the input harder and making it up on the output stage, this plugin creates a buoyance that I hardly find in other emulations.
Then I move to the HP and LP filters, then shape the sound via the compressor. I carve some details here and there in the main guitars and pan the main one slightly to the left. I don't want it centered because it's gonna be in the way of my vocals/kick/snare/bass. For the chorus guitars I noticed there were room guitar microphones, and that is great. I've actually started to use room mikes when recording guitars only recently, and I now regret not having done it before. They add a depth to guitar-oriented tracks that I was always lacking. For this track I want the chorus guitars to open wide left and right. Once I do that, I feel I needed to re-balance the room mikes. I solo the guitars and make sure I like the general soundscape, then I add drums and bass back.
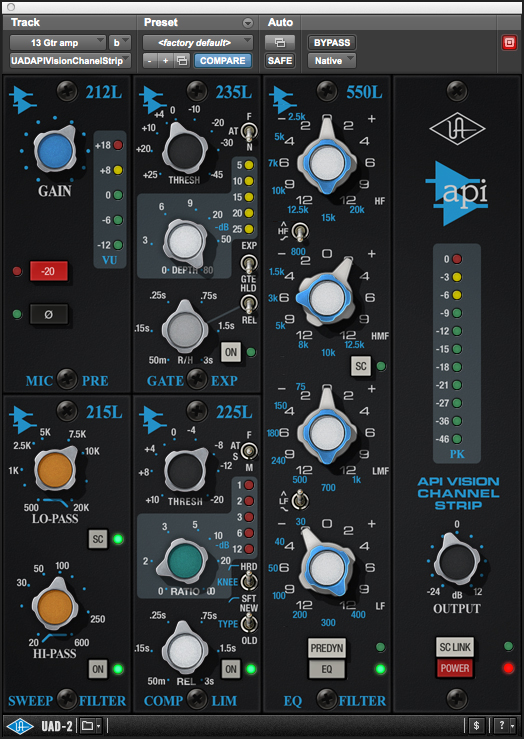
Guitars:
UAD API Vision Channel
(only one shown, each track has slightly different settings)
8. REVERBS, SPACE AND EFFECTS
Reverbs can ruin a good mix in no time. I know what I want so I go ahead and open an UAD EMT 140 and a 250 plates. I set the 140 to be a blatant short reverb and give it a pretty good predelay to make it slap. It's gonna make the reverb appear roughly after most transients have passed. The 250 is going to be my long, thick reverb. As with all reverbs, I tend to find the settings that sound the best to me for the vibe of the song, with a pretty high amount of volume on the return track. If I can make it sound cool when super exposed, it's going to blend perfectly once lowered. After getting the best possible result with the reverb alone, I carve it with an EQ to make it less apparent. Then I take it back to the level I like and start pushing sends into it.
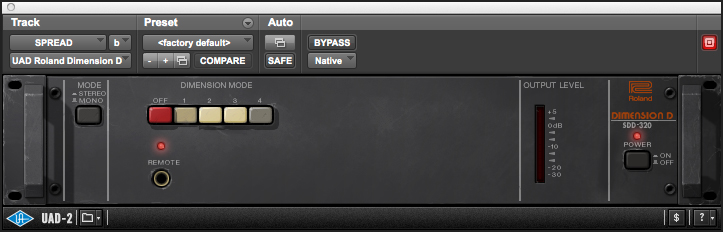
Next in the FX chain are an exciter and something like a spread. The Waves Aphex Aural Exciter works great, I use it to give things more high frequencies and bite without the need to EQ them. For spread I've been using UAD Roland Dimension D. Once set, I start adding sends to pretty much everything I feel like effecting. Setting reverbs, exciters, spread and other effects to the whole session - by experience and instinct - has helped me save time and avoid using compression/equalization to achieve what I want. Some unusual things I remember in this session is that I added the 140 to the outside of the kick only, a lot of it. If you remember that's only HF content from the kick. It really helped put the kit in a definite space, rather than having the bass drum stay in your face, which was not what I wanted.

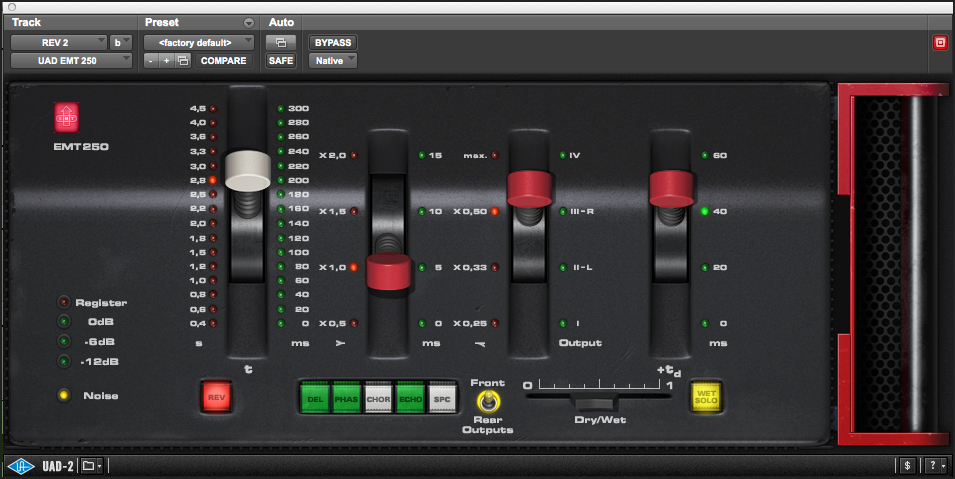

Effects:
UAD Plate 140
UAD Plate 250
Waves Aphex Aural Exciter
UAD Roland Dimension D